The Uneekor EYE XO2 mounts on the ceiling, which means the installation needs more planning than a floor unit. The good news is that the requirements are clear. This guide walks through what to check before you order so installation day goes smoothly.
Specifications below come from Uneekor's EYE XO2 product page and the EYE XO2 installation manual. Always follow the current manual for your unit.
1. Confirm Your Room Size
Uneekor recommends a minimum room of 13 ft wide × 16 ft deep × 10 ft high. Measure the usable space, not wall to wall. Beams, soffits, garage door tracks, lights and storage all reduce what you actually have to work with.
Our room size guide walks through measuring step by step.
2. Plan the Ceiling Height and Sensor Position
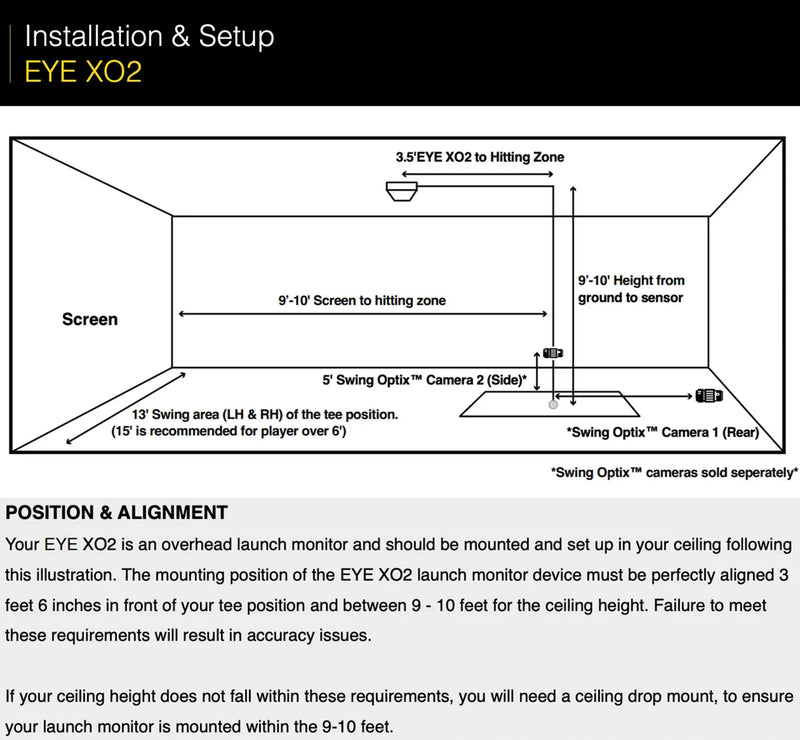
The installation manual specifies a sensor height of 9 to 10 feet, with 10 ft listed as optimal, and placement 3 feet 6 inches in front of the tee position. Measure from the top of your finished hitting surface, not the bare floor, since your mat adds height.
-
Ceiling right around 10 ft: the unit can typically mount close to the ceiling.
-
Ceiling higher than 10 ft: you will likely need a drop mount to bring the sensor down into range.
-
Ceiling under 9 ft: an overhead unit is probably not the right fit. Consider a floor unit like the EYE MINI LITE instead.
Mark the tee position on the floor first, then locate the sensor from there. Make sure the mounting point can be anchored securely into structure, not just drywall.
3. Check Your Swing Clearance
A 10 ft ceiling is the planning reference, but your own swing matters. Tall players and long clubs need more room. Take slow practice swings with no ball where the tee will be, and confirm the club clears the ceiling, the sensor and anything mounted nearby, including the projector.
4. Plan Power and Network
The EYE XO2 connects to your PC with Ethernet. Uneekor includes a CAT6 LAN cable and notes that 2 dedicated Ethernet ports are needed. Plan the cable route from the ceiling to the PC before you mount, and add power at the mounting location. If you need a longer run, we carry a 60 ft CAT6 cable and a replacement power supply.
5. Get the Right PC
Uneekor lists these requirements:
- Windows 11 Home or Pro
- Intel Core i7 (12th Gen or later) or AMD Ryzen 7 (5000 Series or later)
- 32GB RAM
- NVIDIA RTX 4070 Ti or equivalent
Make sure the PC has the network ports you need, or plan for an adapter.
6. Place the Projector Around the Sensor
The projector and the launch monitor both want ceiling space near the hitting area. Plan them together so the projector beam is not blocked and neither one sits in the swing path. Our BenQ AK700ST guide covers throw distance.
7. Calibrate and Play
Once mounted, follow Uneekor's calibration steps in the manual and VIEW software. If you want to practice from rough and sand, the EYE XO2 Trouble Mats are designed for this unit.
Final Thoughts
Most EYE XO2 installation problems come from skipping the planning. Send us your room width, depth, ceiling height and where you want the tee, and we will check it against Uneekor's requirements before you order. Call (619) 927-6193, email info@eliteswingstudio.com, or book a free 30 minute consult.


